Tutorial 6: Connect WiFi
This document will provide a walk-through tutorial to use the Open GoPro Interface to connect the GoPro to a Wifi network either in Access Point (AP) mode or Station (STA) Mode.
Requirements
It is assumed that the hardware and software requirements from the connecting BLE tutorial are present and configured correctly.
The scripts that will be used for this tutorial can be found in the Tutorial 6 Folder.
Just Show me the Demo(s)!!
-
Each of the scripts for this tutorial can be found in the Tutorial 6 directory.
Python >= 3.9 and < 3.12 must be used as specified in the requirementsYou can enable the GoPro’s Access Point to allow it accept Wifi connections as an Access Point via:
$ python wifi_enable.pySee the help for parameter definitions:
$ python wifi_enable.py --help usage: enable_wifi_ap.py [-h] [-i IDENTIFIER] [-t TIMEOUT] Connect to a GoPro camera via BLE, get its WiFi Access Point (AP) info, and enable its AP. options: -h, --help show this help message and exit -i IDENTIFIER, --identifier IDENTIFIER Last 4 digits of GoPro serial number, which is the last 4 digits of the default camera SSID. If not used, first discovered GoPro will be connected to -t TIMEOUT, --timeout TIMEOUT time in seconds to maintain connection before disconnecting. If not set, will maintain connection indefinitelyYou can connect the GoPro to a Wifi network where the GoPro is in Station Mode (STA) via:
$ python connect_as_sta.pySee the help for parameter definitions:
$ python connect_as_sta.py --help Connect the GoPro to a Wifi network where the GoPro is in Station Mode (STA). positional arguments: ssid SSID of network to connect to password Password of network to connect to options: -h, --help show this help message and exit -i IDENTIFIER, --identifier IDENTIFIER Last 4 digits of GoPro serial number, which is the last 4 digits of the default camera SSID. If not used, first discovered GoPro will be connected to -
The Kotlin file for this tutorial can be found on Github.
To perform the tutorial, run the Android Studio project, select “Tutorial 6” from the dropdown and click on “Perform.” This requires that a GoPro is already connected via BLE, i.e. that Tutorial 1 was already run. You can check the BLE status at the top of the app.
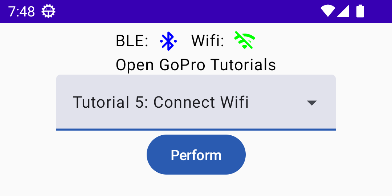
Perform Tutorial 6 This will start the tutorial and log to the screen as it executes. When the tutorial is complete, click “Exit Tutorial” to return to the Tutorial selection screen.
Setup
For both cases, we must first connect to BLE as was discussed in the connecting BLE tutorial.
Access Point Mode (AP)
In AP mode, the GoPro operates as an Access Point, allowing wireless clients to connect and communicate using the Open GoPro HTTP API. The HTTP API provides much of the same functionality as the BLE API as well as some additional functionality. For more information on the HTTP API, see the next 2 tutorials.
In order to connect to the camera in AP mode, after connecting via BLE, pairing, and enabling notifications, we must:
- find the GoPro’s WiFi AP information (SSID and password) via BLE,
- enable the WiFi AP via BLE
- connect to the WiFi AP.
Here is an outline of the steps to do so:
The following subsections will detail this process.
Find WiFi Information
First we must find the target Wifi network’s SSID and password.
Get WiFi SSID
The WiFi SSID can be found by reading from the WiFi AP SSID characteristic of the WiFi Access Point service.
Let’s send the read request to get the SSID and decode it into a string.
-
ssid_uuid = GoProUuid.WIFI_AP_SSID_UUID
logger.info(f"Reading the WiFi AP SSID at {ssid_uuid}")
ssid = (await client.read_gatt_char(ssid_uuid.value)).decode()
logger.info(f"SSID is {ssid}")
There is no need for a synchronization event as the information is available when theread_gatt_charmethod returns.In the demo, this information is logged as such:
Reading the WiFi AP SSID at GoProUuid.WIFI_AP_SSID_UUID SSID is GP24500702 -
ble.readCharacteristic(goproAddress, GoProUUID.WIFI_AP_SSID.uuid).onSuccess { ssid = it.decodeToString() }
Timber.i("SSID is $ssid")
In the demo, this information is logged as such:
Getting the SSID
Read characteristic b5f90002-aa8d-11e3-9046-0002a5d5c51b : value: 64:65:62:75:67:68:65:72:6F:31:31
SSID is debughero11
Get WiFi Password
The WiFi password can be found by reading from the WiFi AP password characteristic of the WiFi Access Point service.
Let’s send the read request to get the password and decode it into a string.
-
password_uuid = GoProUuid.WIFI_AP_PASSWORD_UUID
logger.info(f"Reading the WiFi AP password at {password_uuid}")
password = (await client.read_gatt_char(password_uuid.value)).decode()
logger.info(f"Password is {password}")
There is no need for a synchronization event as the information is available when theread_gatt_charmethod returns.In the demo, this information is logged as such:
Reading the WiFi AP password at GoProUuid.WIFI_AP_PASSWORD_UUID Password is p@d-NNc-2ts -
ble.readCharacteristic(goproAddress, GoProUUID.WIFI_AP_PASSWORD.uuid).onSuccess { password = it.decodeToString() }
Timber.i("Password is $password")
In the demo, this information is logged as such:
Getting the password
Read characteristic b5f90003-aa8d-11e3-9046-0002a5d5c51b : value: 7A:33:79:2D:44:43:58:2D:50:68:6A
Password is z3y-DCX-Phj
Enable WiFi AP
Before we can connect to the WiFi AP, we have to make sure the access point is enabled. This is accomplished via the AP Control command:
| Command | Bytes |
|---|---|
| Ap Control Enable | 0x03 0x17 0x01 0x01 |
| Ap Control Disable | 0x03 0x17 0x01 0x00 |
Let’s write the bytes to the “Command Request UUID” to enable the WiFi AP!
-
event.clear()
request = bytes([0x03, 0x17, 0x01, 0x01])
command_request_uuid = GoProUuid.COMMAND_REQ_UUID
await client.write_gatt_char(command_request_uuid.value, request, response=True)
await event.wait()  # Wait to receive the notification response
We make sure to clear the synchronization event before writing, then pend on the event until it is set in the notification callback. -
val enableWifiCommand = ubyteArrayOf(0x03U, 0x17U, 0x01U, 0x01U)
ble.writeCharacteristic(goproAddress, GoProUUID.CQ_COMMAND.uuid, enableWifiCommand)
receivedData.receive()
Note that we have received the “Command Status” notification response from the Command Response characteristic since we enabled it’s notifications in Enable Notifications. This can be seen in the demo log:
-
Enabling the WiFi AP Writing to GoProUuid.COMMAND_REQ_UUID: 03:17:01:01 Received response at GoProUuid.COMMAND_RSP_UUID: 02:17:00 Command sent successfully WiFi AP is enabled -
Enabling the camera's Wifi AP
Writing characteristic b5f90072-aa8d-11e3-9046-0002a5d5c51b ==> 03:17:01:01
Wrote characteristic b5f90072-aa8d-11e3-9046-0002a5d5c51b
Characteristic b5f90073-aa8d-11e3-9046-0002a5d5c51b changed | value: 02:17:00
Received response on b5f90073-aa8d-11e3-9046-0002a5d5c51b: 02:17:00
Command sent successfully
As expected, the response was received on the correct UUID and the status was “success”.
Establish Connection to WiFi AP
-
If you have been following through the
ble_enable_wifi.pyscript, you will notice that it ends here such that we know the WiFi SSID / password and the WiFi AP is enabled. This is because there are many different methods of connecting to the WiFi AP depending on your OS and the framework you are using to develop. You could, for example, simply use your OS’s WiFi GUI to connect.While out of the scope of these tutorials, there is a programmatic example of this in the cross-platformWiFi Demofrom the Open GoPro Python SDK. -
Using the passwsord and SSID we discovered above, we will now connect to the camera’s network:
wifi.connect(ssid, password)This should show a system popup on your Android device that eventually goes away once the Wifi is connected.
This connection process appears to vary drastically in time.
Quiz time! 📚 ✏️
You are now connected to the GoPro’s Wifi AP and can send any of the HTTP commands defined in the HTTP Specification.
Station (STA) Mode
Station Mode is where the GoPro operates as a Station, allowing the camera to connect to and communicate with an Access Point such as a switch or a router. This is used, for example, in the livestreaming and camera on the home network (COHN) features.
In order to configure the GoPro in Station mode, after connecting via BLE, pairing, and enabling notifications, we must:
- scan for available networks
- connect to a discovered network, using the correct API based on whether or not we have previously connected to this network
The following subsections will detail these steps. All of the Protobuf operations are performed in the same manner as
in the protobuf tutorial such as reusing the ResponseManager.
Scan for Networks
The process of scanning for networks requires several Protobuf Operations as summarized here:
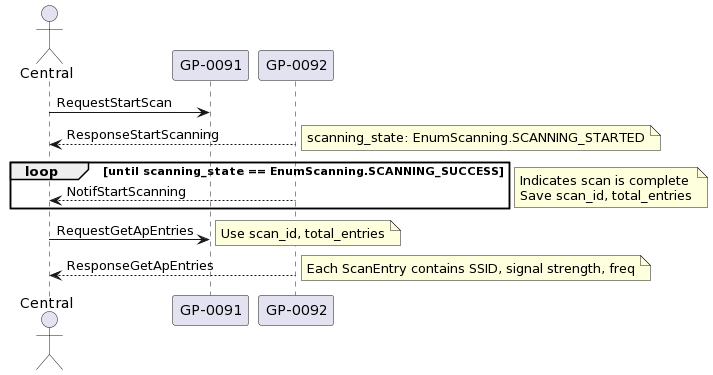
First we must request the GoPro to Scan For Access Points:
-
The code here is taken from
connect_as_sta.pyLet’s send the scan request and then retrieve and parse notifications until we receive a notification where the
scanning_stateis set to SCANNING_SUCCESS. Then we store thescan idfrom the notification for later use in retrieving the scan results.start_scan_request = bytearray( [ 0x02, # Feature ID 0x02, # Action ID *proto.RequestStartScan().SerializePartialToString(), ] ) start_scan_request.insert(0, len(start_scan_request)) await manager.client.write_gatt_char(GoProUuid.NETWORK_MANAGEMENT_REQ_UUID.value, start_scan_request, response=True) while response := await manager.get_next_response_as_protobuf(): ... elif response.action_id == 0x0B: # Scan Notifications scan_notification: proto.NotifStartScanning = response.data # type: ignore logger.info(f"Received scan notification: {scan_notification}") if scan_notification.scanning_state == proto.EnumScanning.SCANNING_SUCCESS: return scan_notification.scan_idThis will log as such:
Scanning for available Wifi Networks Writing: 02:02:02 Received response at GoProUuid.NETWORK_MANAGEMENT_RSP_UUID: 06:02:82:08:01:10:02 Received response at GoProUuid.NETWORK_MANAGEMENT_RSP_UUID: 0a:02:0b:08:05:10:01:18:05:20:01 Received scan notification: scanning_state: SCANNING_SUCCESS scan_id: 1 total_entries: 5 total_configured_ssid: 1 -
TODO
Next we must request the GoPro to
return the Scan Results.
Using the scan_id from above, let’s send the
Get AP Scan Results request, then
retrieve and parse the response:
-
results_request = bytearray(
    [
        0x02,  # Feature ID
        0x03,  # Action ID
        *proto.RequestGetApEntries(start_index=0, max_entries=100, scan_id=scan_id).SerializePartialToString(),
    ]
)
results_request.insert(0, len(results_request))
await manager.client.write_gatt_char(GoProUuid.NETWORK_MANAGEMENT_REQ_UUID.value, results_request, response=True)
response := await manager.get_next_response_as_protobuf():
entries_response: proto.ResponseGetApEntries = response.data  # type: ignore
logger.info("Found the following networks:")
for entry in entries_response.entries:
    logger.info(str(entry))
return list(entries_response.entries)
This will log as such:
Getting the scanned networks. Writing: 08:02:03:08:00:10:64:18:01 Received response at GoProUuid.NETWORK_MANAGEMENT_RSP_UUID: 20:76:02:83:08:01:10:01:1a:13:0a:0a:64:61:62:75:67:64:61:62 Received response at GoProUuid.NETWORK_MANAGEMENT_RSP_UUID: 80:75:67:10:03:20:e4:28:28:2f:1a:13:0a:0a:41:54:54:54:70:34 Received response at GoProUuid.NETWORK_MANAGEMENT_RSP_UUID: 81:72:36:46:69:10:02:20:f1:2c:28:01:1a:13:0a:0a:41:54:54:62 Received response at GoProUuid.NETWORK_MANAGEMENT_RSP_UUID: 82:37:4a:67:41:77:61:10:02:20:99:2d:28:01:1a:16:0a:0d:52:69 Received response at GoProUuid.NETWORK_MANAGEMENT_RSP_UUID: 83:6e:67:20:53:65:74:75:70:20:65:37:10:01:20:ec:12:28:00:1a Received response at GoProUuid.NETWORK_MANAGEMENT_RSP_UUID: 84:17:0a:0e:48:6f:6d:65:79:6e:65:74:5f:32:47:45:58:54:10:01 Received response at GoProUuid.NETWORK_MANAGEMENT_RSP_UUID: 85:20:85:13:28:01 Found the following networks: ssid: "dabugdabug" signal_strength_bars: 3 signal_frequency_mhz: 5220 scan_entry_flags: 47 ssid: "ATTTp4r6Fi" signal_strength_bars: 2 signal_frequency_mhz: 5745 scan_entry_flags: 1 ssid: "ATTb7JgAwa" signal_strength_bars: 2 signal_frequency_mhz: 5785 scan_entry_flags: 1 ssid: "Ring Setup e7" signal_strength_bars: 1 signal_frequency_mhz: 2412 scan_entry_flags: 0 ssid: "Homeynet_2GEXT" signal_strength_bars: 1 signal_frequency_mhz: 2437 scan_entry_flags: 1 -
TODO
At this point we have all of the discovered networks. Continue on to see how to use this information.
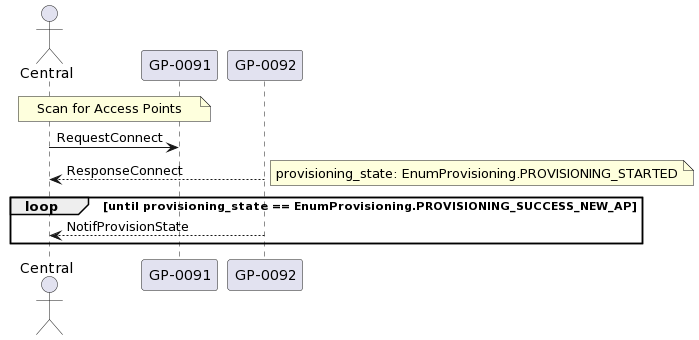
Connect to Network
Depending on whether the GoPro has already connected to the desired network, we must next perform either the Connect or Connect New operation. This will be described below but first, a note on fragmentation:
GATT Write Fragmentation
Up to this point in the tutorials, all of the operations we have been performing have resulted in GATT write requests guaranteed to be less than maximum BLE packet size of 20 bytes. However, depending on the SSID and password used in the Connect New operation, this maximum size might be surpassed. Therefore, it is necessary to fragment the payload. This is essentially the inverse of the accumulation algorithm. We accomplish this as follows:
-
Let’s create a generator to yield fragmented packets (
yield_fragmented_packets) from a monolithic payload. First, depending on the length of the payload, we create the header for the first packet that specifies the total payload length:if length < (2**13 - 1): header = bytearray((length | 0x2000).to_bytes(2, "big", signed=False)) elif length < (2**16 - 1): header = bytearray((length | 0x6400).to_bytes(2, "big", signed=False))Then we chunk through the payload, prepending either the above header for the first packet or the continuation header for subsequent packets:
byte_index = 0
while bytes_remaining := length - byte_index:
    # If this is the first packet, use the appropriate header. Else use the continuation header
    if is_first_packet:
        packet = bytearray(header)
        is_first_packet = False
    else:
        packet = bytearray(CONTINUATION_HEADER)
    # Build the current packet
    packet_size = min(MAX_PACKET_SIZE - len(packet), bytes_remaining)
    packet.extend(bytearray(payload[byte_index : byte_index + packet_size]))
    yield bytes(packet)
    # Increment byte_index for continued processing
    byte_index += packet_size
Finally we create a helper method that we can reuse throughout the tutorials to use this generator to send GATT Writes using a given Bleak client:
async def fragment_and_write_gatt_char(client: BleakClient, char_specifier: str, data: bytes): for packet in yield_fragmented_packets(data): await client.write_gatt_char(char_specifier, packet, response=True) -
TODO
Connect Example
In order to proceed, we must first inspect the scan result gathered from the previous section to see which connect operation to use. Specifically we are checking the scan_entry_flags to see if the SCAN_FLAG_CONFIGURED bit is set. If the bit is set (and thus we have already provisioned this network) then we must use Connect . Otherwise we must use Connect New:
-
if entry.scan_entry_flags & proto.EnumScanEntryFlags.SCAN_FLAG_CONFIGURED: connect_request = bytearray( [ 0x02, # Feature ID 0x04, # Action ID *proto.RequestConnect(ssid=entry.ssid).SerializePartialToString(), ] ) else: connect_request = bytearray( [ 0x02, # Feature ID 0x05, # Action ID *proto.RequestConnectNew(ssid=entry.ssid, password=password).SerializePartialToString(), ] ) -
TODO
Now that we have the correct request built, we can send it (using our newly created fragmentation method) we can send it.
Then we will continuously receive
Provisioning Notifications which should be checked until
the provisioning_state is set to
PROVISIONING_SUCCESS_NEW_AP.
provisioning_state that we are looking for is always PROVISIONING_SUCCESS_NEW_AP both in the Connect and
Connect New use cases.
The procedure is summarized here:
-
await fragment_and_write_gatt_char(manager.client, GoProUuid.NETWORK_MANAGEMENT_REQ_UUID.value, connect_request) while response := await manager.get_next_response_as_protobuf(): ... elif response.action_id == 0x0C: # NotifProvisioningState Notifications provisioning_notification: proto.NotifProvisioningState = response.data # type: ignore if provisioning_notification.provisioning_state == proto.EnumProvisioning.PROVISIONING_SUCCESS_NEW_AP: return -
TODO
At this point, the GoPro is connect to the desired network in Station Mode!
Quiz time! 📚 ✏️
Troubleshooting
See the first tutorial’s BLE troubleshooting section to troubleshoot BLE problems.
Good Job!
You have now connected the GoPro to a WiFi network in either AP or STA mode.
To see how to make use of AP mode, continue to the next tutorial.
To see how make use of STA mode, continue to the camera on the home network tutorial.